Hey there, fellow cyclist! Whether you’re looking to do a properly long ride for the first time, planning a big race or event, or you’re just trying to make your long rides a better experience, we’ve got all the details on what you should be packing to ensure your ride goes smooth and stays fun. When you’re riding 50, 100 or 150+ miles, you need to be serious about optimizing the food and gear you take.
50+ miles is going over 3-4 hours of ride time. Add in stops and you might be out for 6-8 hours. You’re leaving the realm of relatively “easy” rides and probably adventuring further from home. Not properly preparing could become legitimately dangerous. But let me just say, when you get it right and stick to your plan, you feel like a bada$$ pro. There’s a certain joy that comes with taking on such a big effort and successfully completing it, self-supported.
And lastly, we’re assuming your fitness and bike are ready for a long ride of over 50 miles. Please don’t just jump into these distances without gradually working your way up first.
Table of Contents
- Fueling Your Ride: Nutrition Essentials
- Hydration first
- Electrolytes for Endurance
- Snacks and gels
- Fueling Strategy: How Often and How Much
- Tools of the Trade: Must-Have Gear
- Flat Tire: Repair Kits
- Multi-Tools
- Hand Pump or CO2? Both.
- Lights - be seen!
- Extra items to stash
- Where to Stash Your Stuff - options!
- Saddlebags or Seat Packs: Just in case items
- Jersey Pockets: Stuff you’ll definitely needFrame Bags: Aero storage
- Handlebar Bags: Cool but slow
- Top-tube bags: Easiest access
- Panniers: only for the longest haul
Fueling Your Ride: Nutrition Essentials
Hydration first
The fastest way to get in trouble is under-hydrating. When you’re riding under 50 miles, maybe an hour or two, you can get by on water and you can get away with not drinking enough. By the time your body starts to have any negative reactions, you’re home and chugging water. Now that you’re stepping up your distance beyond 90 minutes, you need to know how much water you’re going to drink, at what intervals of time AND it’s time to add a proper hydration mix (sports drink). See subsection b below.
Bottles or hydration pack?
Most experienced cyclists riding 50-100 miles are probably just taking bottles and planning water stops, as opposed to using a hydration pack. However, sometimes a hydration pack is best for newer cyclists because the hose is easier to drink from than a bottle that you have to grab and put back while riding. Easier access = more likely to use it. Also, they carry a higher volume of water, which gives you wiggle room if you’re worried about running out of water.
If using bottles, plan on stopping to refill your bottles multiple times. A well planned route will have designated water stops decided beforehand. Usually, this is a gas station because they’ll give free water out of the fountain, plus they have bathrooms and high-calorie, low cost snacks (jackpot!).
How much water should I drink?
The next (and critical) question is how much water to drink? This is very personal and actually depends on your sweat rate, which depends on where and when and how you’re riding. Not everyone sweats the same. To get really specific, google “sweat test cycling.” You can do it at home.
First, you should be hydrated before riding, and just, in general, for life. But it’s extra important if you know you’re heading out for a big ride! Once you’re riding,a general rule of thumb is at least 20-35 oz of fluids per hour. That’s counting sports drink or hydration mix also. Again, let us reiterate that a) you sweat differently from everyone else and b) this is heavily weather and ride conditions dependent. Obviously, your needs are different when you’re hammering in 90 degree temps than you do when it’s 50 degrees and you’re soft-pedaling.
*PRO tip: most cycling computers let you set a repeating timer. Set one to go off every 15 minutes to remind you to take 2 or 3 big swigs from your bottles. Annoying, maybe. Effective, yes.
| "A general rule of thumb is at least 20-35 oz of fluids per hour."
Electrolytes for Endurance
Like we said, at these distances, water is not enough. You need to be including the carbs and electrolytes of a well-balanced hydration mix. We hesitate to call it “sports drink” because that makes people think Gatorade, and while you could get away with the big G, you’d probably be wise to use something actually made for cyclists. We prefer the Skratch hydration mix, but honestly there’s a million good products that all have slightly different mixtures and taste.
Best bet is to go to your local bike shop, see what they have and recommend and follow the instructions on the bag for how much to put in each bottle.
How to refill drink mix while riding?
We usually take one large bottle of water, and one large bottle of water with drink mix mixed in, planning to refill somewhere. Obviously, if you start with a bottle of drink mix, you’ll drink it and need more before you’re done riding. You have a few options.
Tablets: Electrolyte tablets and products like Nuun, which comes in its own easily storable little tube, are simple to carry in a jersey pocket and add to water when you refill. Be sure you know how much you need, like with the drink mix, so you are staying topped up on electrolytes after that first bottle.
Gas station drinks: This is not the time to try a brand new Monster Java flavor, but there typically tons of sports drinks and energy drinks on offer at every gas station. Also, Coke is a popular choice. You probably want to water it down a little, and if you can, get the Mexican Coke with the real sugar. This approach is a little more risky, since you’re introducing more unknown variety. However, if you plan to race or participate in official events, this is good practice for adapting your stomach to accept the many drinks you might have available at an aid station.
Ziploc bag of mix: Just measure what you’ll need and put it in a ziploc bag in your jersey pocket. Dump in bottles. Not the most elegant option, but it works.
Snacks & gels
Honestly, the food while we ride is one of the biggest bonuses in cycling. We get to eat super high carb, usually sweet foods and justify it by saying “It’s fuel!” Which, it is. Personal favorite at the gas station is a Payday bar. Salty, sugary - yum!
A few tips to finding your own personal winning combo:
- Test, test, test. A lot of bike shops let you buy single gels or ride snacks. Try a bunch. Find the flavors and textures you like.
- Gel or no? Some people just hate gels. While they’re effective at delivering the nutrition you need and easy to carry, the eating experience isn’t the best. The speed and route of your ride might mean you need to keep your snacks simple and get in the calories as quickly as possible. Gels are great for this. If you’re in no hurry, it’s fine to stop or situp and eat something more solid.
- Easily digestible is key. And avoid the fiber! If it makes you poop, don’t eat it on your ride. Simple.
- Caffeine? Some people like some caffeine in a gel or drink. Some don’t. Try it, see how you do.
| TEST, TEST, TEST.
Fueling Strategy: How Often and How Much
Avoid the bonk
If you don’t eat enough, you’ll bonk, i.e. energy goes to zero and literally you can’t turn the pedals over anymore. It’s a horrible feeling, especially if you’re 20 miles from home. And, you can’t just stuff in food and drink and jump back on the bike in a few minutes. To keep those energy levels up and avoid bonking, you should be carrying a good stash of energy bars, gels, or other food.
Fueling your body during a long ride is crucial. You’ll often see professional endurance and ultra racers describe their races and big rides as just moving buffets. When riding over three hours, aim to consume about 45-90 grams of carbohydrates per hour (180-360 calories). Again, how and where you’re riding will affect this need. Break this down into smaller portions every 20-30 minutes to avoid energy crashes.
Like we mentioned earlier, a timer on your bike computer or phone is great for staying on top of your fueling. You’d be surprised at how good you can feel after a long ride that is fuelled properly. It’s not easy to eat and drink enough while riding and most cyclists don’t realize truly how much they should be taking in.
Tools of the Trade: Must-Have Gear
Flat Tires: Repair Kits
Be your own hero when faced with a flat. Pack a compact tire repair kit, including tire levers (these might be on your multi-tool), a spare tube or two, and reliable patches. For over 50 miles, we’re packing two spare tubes, just to be safe. If your wheels are tubeless, take tire plugs also. Make sure you can confidently change and inflate a tube before hitting the road. This includes using a hand pump AND a CO2 inflator. Literally, practice in your living room. Time yourself.
Multi-Tool
Multi-tools these days are great. So many functions in compact, durable packages. You should have one that includes a variety of wrenches, screwdrivers, and a chain tool – just in case. There is no shortage of reviews on these kinds of products, so go find the right one for the type of riding you’re doing.
Hand Pump or CO2? Both.
Flat tires will happen. When, not if. Carry a lightweight, portable hand pump in a bag or jersey pocket. In your saddle bag, store a couple CO2s and an inflator head. Practice using these. Once you crack a CO2 open, it’s very easy to use it all up and once it’s gone, that’s it. Hand pumps vary greatly in quality and capabilities, so again, do some research and find the right one. Your MTB and road bike likely won’t use the same one.
Lights - be seen!
We cannot overstate the importance of lights and reflectivity on the roads. If we could make one rule for cyclists, other than “helmet’s are mandatory” it would be “front and rear lights are mandatory, at all times.”
GET GOOD LIGHTS. Please, for you and your family’s sake. Studies have shown that good lights make you safer during the day and night. You should have a white light on front and a red one on back. There’s even been research on the flash patterns and which ones are most likely to grab a motorists attention. Do your research like your life depends on it.
Our stance on this is “more is better.” Bright colors, lights, reflective details on clothing, kit and bikes. The only truly important outcome from a bike ride is that you return home.
Extra items to stash
From experience, let us recommend these few extra things be added to your saddlebag.
- $20 bill. Yes, you should be carrying a credit card and a phone (which you can likely pay with at most places now), but it’s a good idea to just tuck a $20 in your bag or ride wallet just in case. You never know when your phone will die or you need to pay a motorist to give you a lift, or you want to buy something somewhere that only accepts cash. Additionally, paper money works pretty well as a tire boot. If your tire gets a hole or gash, you can fold up the bill and put it in between your tire and tube before inflating to help keep your tube from puncturing while you ride home.
- Spare chain link. Learn how to use it.
- A foot of electrical tape. Wrap it up tight, always carry it. Enormously helpful keeping your bike together to get you home.
Where to Stash Your Stuff - options!
Ride Wallet
Lots of brands sell these products. Essentially, it’s a waterproof wallet designed to hold your phone, some cards or cash, maybe a CO2 and fit in your jersey pocket. Yes, you can use a ziploc bag or just let your phone and cards ride loose and get sweaty, but a real ride wallet is better, trust us.
Saddlebags or Seat Packs: Just in case items
On the seat-tube and under your saddle is the best place to store and carry gear. Usually, you’ll use a saddlebag AND another storage option. For us, it’s typically just saddle bag and jersey pockets (pretty traditional). Aerodynamically speaking, ithe saddle bag is out of the way and comfort wise, you won’t chafe your legs on it while pedaling. It’s not a great spot for food, or your phone, since you likely need to grab these things while riding.
Pick the right size for you (generally, we try to go as small as possible), but this is option #1 for storing a repair kit, tube(s), multi-tool, CO2 and your cash and tape. Just please, please have some pride and make sure it’s not swinging around. Don’t buy the first one you see on Amazon. Bonus points if it integrates with your seat and/or has reflective details.
Jersey Pockets: Stuff you’ll definitely need
Second best storage option. This is where we keep our food, hand pump, ride wallet with phone and maybe another spare tube. Keep the load balanced to avoid an uncomfortable ride.
Frame Bags: Aero storage
Frame bags fit within your bike's main triangle. They offer a balanced weight distribution. Perfect for storing larger items like the hand pump, spare tubes, extra clothing, your ride wallet and snacks. Usually, very easy to access while riding, since it’s in front of you. Thanks to the explosion of gravel and bike-packing, you can now find these in about every size and shape.
Assuming you buy a smaller one that fits nicely behind your stem, this is a pretty aero option. Plus, it’s the easiest storage access-wise. Great spot to just put a few gels and maybe a candy bar.
Yes, we’ve been convinced that these look cool. The burrito-style bag has had a great few years. That being said, they’ll cost you real watts. Which is funny when you’re wearing aero clothing, and a $300 aero helmet. But if you’re out all day cruising, time and effort probably doesn’t matter as much, so go for it.
If you aren’t doing a multi-day trip or commuting to work, panniers are not for you.
Organize and store your gear
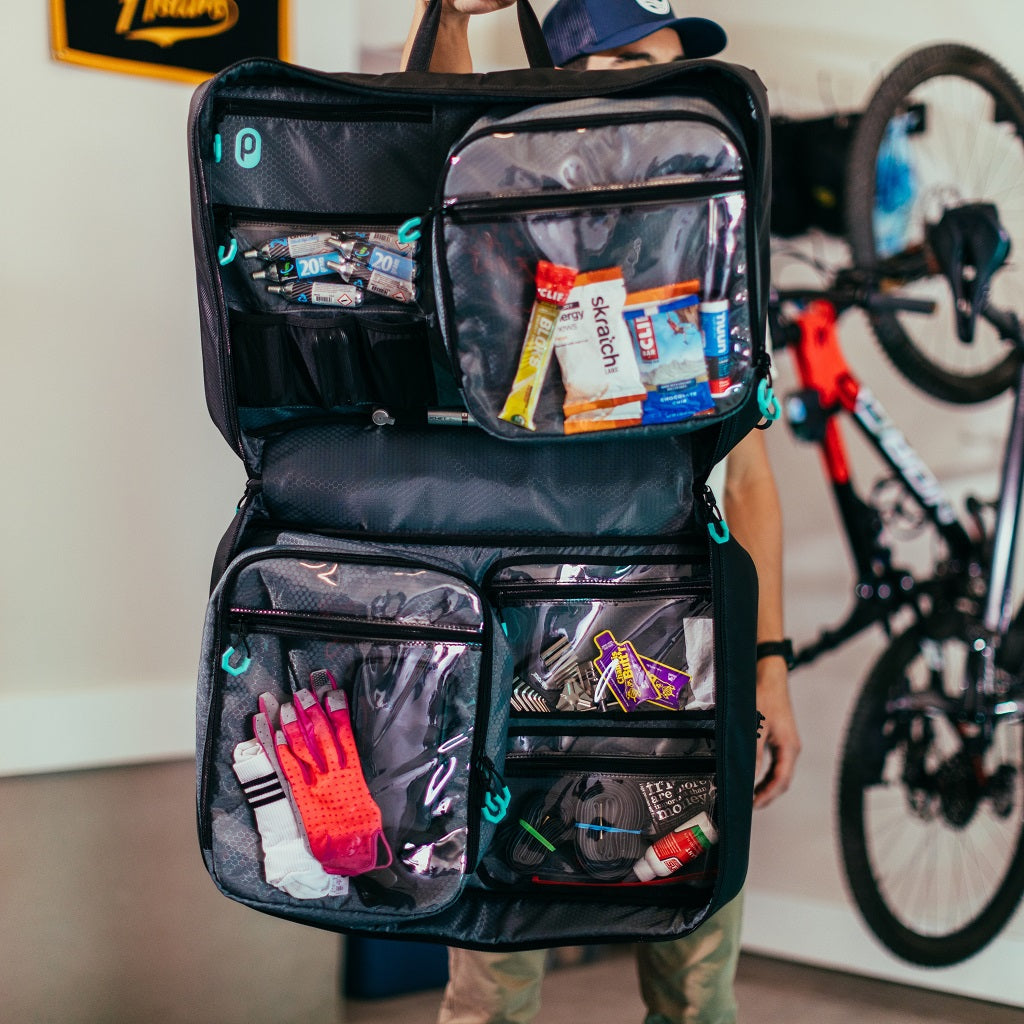
If you’re riding such long distances, you’ve probably accumulated a decent amount of clothes, kit, tools, spare parts, nutrition products etc. Cycling is pretty simple (pedal, repeat) but involves a lot of gear to do it year-round. How do you organize it all to make sure that you can enjoy riding your bike, and aren’t just constantly searching for gear?
Most folks will have clothes in a closet, tools in a tool box or drawer, snacks in the kitchen, shoes, helmet and bike in the garage. Why not just keep it altogether? All your gear, in one place, always. If it sounds simple, well, it is. The Bag was built with more than 20 cycling specific features, including 16 pockets, big and small, that allow you to organize and see everything from shoes to helmet to snacks, computer, tools, socks and pumps. You can hang it at home, making it quick to grab everything you need when heading out to ride, and then zip it up or hang it in the car when you’re driving to the ride. You don’t have to pack and unpack every time you leave, which inevitably would lead to lost and forgotten items. There’s no other cycling bag like it.
Check out The Bag here, and get organized so you can spend your time planning your next epic route instead of worrying about where your gloves went.
That’s it. You’re ready. Enjoy your long day out! The simplicity of transporting yourself across such a huge distance, fully self-sufficient is amazing, and underrated.
Remember, the key is to find a setup that works for you. Test, test, test!